The Ultimate Checklist For Every Hike >**)&#How to Pack a Hiking Backpack
Proper packing of a hiking backpack is essential if you want to have a safe, more comfortable and enjoyable hiking experience. A good backpack can bullshit the weight very nice and can keep easily balanced on your back with easy access to all of your gear. Before you go: the ultimate guide to packing your hiking backpackToday, get a run of all things going on during this journey show in this session which has checklists, tips and expert advice either you are planning for a day hike or multi-day long trek.
Table of Contents
1. Introduction
2. Choosing the Right Backpack
– Types of Hiking Backpacks
– Features to Look For
3. The Definitive Hiking Backpack Packing List
– Core Essentials
– Clothing and Layers
– Food and Hydration
– Navigation and Safety Gear
– Emergency Supplies
– Extras and Comfort Items
4. How to Organize Your Backpack
– Top vs. Front-Loader Backpacks
– Packing Techniques
– Weight Distribution
5. Packing For Various Hikes
– Day Hikes
– Overnight Hikes
– Multi-Day Hikes
6. What to Pack — Extras by Season
– Summer
– Winter
– Spring and Fall
7. Ways of Reducing Backpack Weight
8. Adjusting Your Backpack for hiking comfort
9. Packing Mistakes to Avoid
10. Conclusion
Introduction
Packing a hiking backpack not only means getting everything in, but involves smart packing, weight distribution, and preparing for any contingency. We all know that a well-packed backpack can make your hike far more enjoyable and safer. In this article, we will give you all the right tips and advice for what to properly pack in your backpack as well as how to pack it and even some ways when adjusting your backpack to ensure you are all set for whatever type of adventure that lies ahead, from a simple day hike with comfort to a lengthy multi-day trek.
Finding the perfect backpack
Choosing a good backpack is the first step to getting above average gas-mileage on your back! What kind and size of backpack to buy will be determined by the type and length of hike you plan on taking. Quick links to see all five backpack types:What to Look for in a Backpack
Types of Hiking Backpacks
1. Daypacks
– Capacity: 15-30 liters
– Great for: Day treks, fast walks.
Features: generally light and provide limited storage. Great for carrying water, snacks, and a first aiding kit.
2. Hydration Packs
Rating: Fair for 1.5-3 Liter rated water with just a skimpy bit of gear
– For: Quick hiking trails or biking
– Attributes: Equipped with water reservoir ( bladder ) housed inline. Perfect for Drinking & On the Go
3. Overnight Packs
– Capacity: 30-50 liters
Best For: Overnight trips, weekend getaways
– Function: Additional space for a tent, sleeping bag, and extra clothes Balance of size & weight
4. Multi-Day Backpacking Packs
– Capacity: 50-70+ liters
Best For: Longer trips, backpacking
– Furnishings: Plenty of room for camping gear, food and more Built_for comfortable heavy loads.
#Features to Look For
– Fit and Adjustability: A backpack should be standard for your torso length but also include adjustable straps to help adjust the fit. Knowing that another consideration is body size, Marumoto advises to find a pack with adjustable hip belts and shoulder straps.
Ventilation: Mesh panels and padded hip belts to help reduce sweating and these features aid in added comfort.
Durability: Pick a backpack that is constructed from rugged materials and finished with reinforced stitching, to stand-up to serious conditions.
– Accessibility: Pockets, compartments and external gear attachments allow you to organize and easily access your gear.
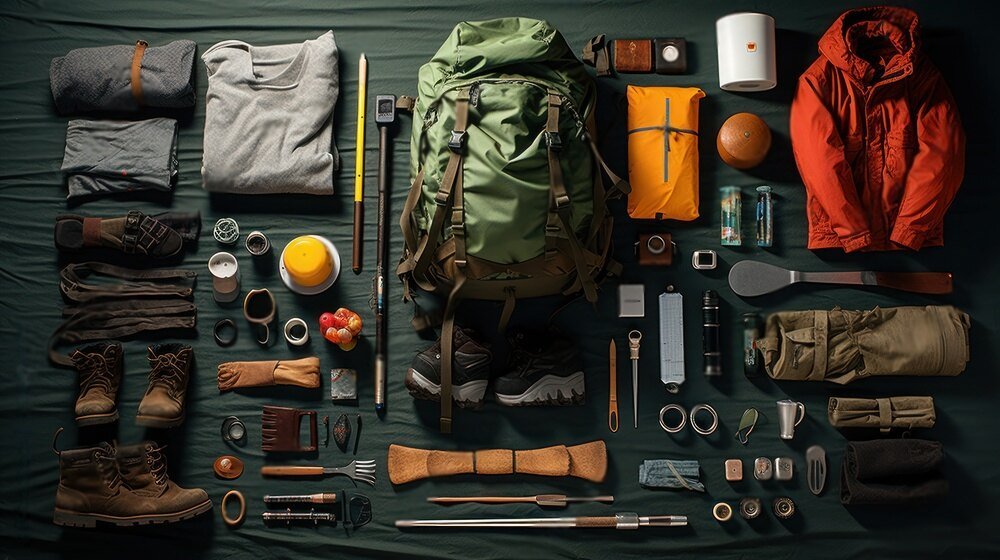
##Complete Hiking Backpack Packing Checklist
Having a good check list is key to packing your backpack. Q: What to bring on your hike? Here is the list for you.
#Core Essentials
– Backpack (based on the hike type and length you will need)
Navigation:Map, Compass or GPS device Make sure you have something like MAPS for accurate guidance, particularly off the beaten path.
First Aid Kit: Including bandages, antiseptic, pain relievers, and any personal medications. A good first aid kit will help you take care of minor injuries and get out of a jam until you can find more advanced medical treatment.
Multi-Tool or Knife: Eating, gear fixes, first aid recommended.
– Starter fire: Matches or lighter, fire starter kit Do still carry a good fire-starter in the event of emergencies.
#Clothing and Layers
Base Layer: Changes with the seasons but an example is a moisture wicking shirt and underwear to keep your skin dry.
– Mid Layer: (Insulating layer e.水泥大姐very warm fleece jacket or down vest.)
Outer Layer- Waterproof and Windproof jacket or shell to block the elements.
– Hiking Pants/ Shorts. Decided by weather and the terrain. Choose fabric that breathes and dries quickly.
Hat and Gloves – For cold weather or if you are going to high altitude Make sure that they are light and do not take up much space when packed.
– A Spare Socks and Underwear: Unexpected things can happen on the way to you, so always have 2 pairs or more. Blisters happen when your socks get wet from sweat and add friction inside wet shoes that rub on your feet.
#Food and Hydration
Water — hydration system (bladder) or bottles At least 2 Liters of water per day And if you plan to refill waters on the trail, bring a water filter!
Water Filter or Purification Tablets (to refill water along the way) Prepare Access To Potable Water
High-Energy Snacks- Trail mix, energy bars, nuts (cashews or peanuts) and dried fruit. These fuel faster carb stores and are portable.
: Meals-If going on a longer hike, prepare pre-packaged or dehydrated meals to keep […] Make sure they are full of nutrients and easy to make!
Navigation and Safety Gear
– Headlamp or Flashlight (with extra batteries) You’ll want a headlamp for hands-free light.
Crying Whistle (Sound & Emergency Signal) A whistle can be heard at longer distances and it is more effective than yelling.
– Emergency Shelter: Mylar blankets that are lightweight and compact provide emergency warmth.
Sun Protection: sunscreen, SPF lip balm and sunglasses. Avoid the sun’s UV rays at any point in time as they tend to harmful, particularly when you are a high altitude.
#Emergency Supplies
— Bug Spray to keep all the bugs and ticks away. Pick the one with DEET or other lasted item.
– ID doc, possibly other registrations instead Make sure will all writers bring i.d. and permits to places that require them.
Backup Power: Portable charger – For your Electronics. For emergencies, make sure to keep your phone and other devices charged.
#Extras and Comfort Items
Trekking Poles: For more stability and support. Use Trekking poles — Help in taking pressure off of the knees and give you balance.
– Camera/Smartphone: To Click Memories Make Sure You Are Fully Charged or Have a Source of Power.
Notebook and Pen to Journal or Use for Notes of Navigation Great to record your path or make some observations.
– Repair Kit: To make gear or clothing repairs. Things like duct tape, needle and thread, or spare parts to my gear.
How to Pack Your Backpack
Not only do you want to be able to easily get to your stuff, but securing it properly ensures a balanced load for better comfort and stability on the trail.
** 3 Top-Loading vs. Front-Loading Backpacks **
– Top-Loading Backpacks:
Pros: Easy to use, often light in weight
How to Pack: Heavy toward your back, lighter stuff up in the top lid. Invest in some stuff sacks or dry bags to subdivide gear easily inside the main compartment.
– Front-Loading Backpacks:
– Pros: Easier access to all chambers.
* Packing: Store items so that they be retrieved easily. Front panel access makes all your gear easily accessible without spilling any contents.
#Packing Techniques
– Layering: Heavy items at the bottom. Packk these heavy itemns closest to your back and lightest on top. It helps to preserve equilibrium and lessen stress.
Compression: Compression straps to tighten and stabilize your load. This reduce stuff which is in the bag from moving and getting all around.
#Weight Distribution
Proper Load — Make sure the load is distributed across both of your back and hips. Center and load them as close to your back as possible to keep the weight balance.
– Tighten Straps — Make sure shoulder straps, hip belt and load lifters are adjusted for a snug fit This will help you keep the bra in place and avoid any discomfort.
2: Packing for the Type of Hike
Every hike has its unique packing technique. How to Customize a Hiking Packing List for Different Types of Hikes
#Day Hikes
Essentials — Water, snacks, basic first aid (moleskin any hot spots), map and weather appropriates clothes. These are the types of hikes that require little gear but be sure to be prepared for any sudden change in weather.
OptionalCameraextra layers, lightweight emergency gear Pack items that improve your hiking and camping experience, without weighing you down.
#Overnight Hikes
– Essentials such as the sleeping bag, pad, shelter/tent, food and clothing. You need more things for overnight hikes (like camping gear and extra food).
– Optional (camp stove, cookware, additional comfort items) You might also want to take things like a camping stove so you can cook, and anything else that helps make camp life more comfortable.
#Multi-Day Hikes
Essentials: camping equipment; tent/sleeping bag/stove, food/water treatment, complete first aid kit. For longer treks, a good bag could last you anywhere between 5-10 years.
packing the right things on your list so you do not forget anything for a long stay.
Solar charger, larger repairs kit & more comfort items. On extended trips, think about adding a solar charger for devices, and including more repair material in your kit.
Seasonal Loose PackingTips
Different seasons require different gear and clothes, which vary with the weather.
#Summer
Lightweight Clothing: Fabrics that breath and wick away moisture for your body to keep you cool but dry.
– Sunscreen: For protection from UV rays, including high SPF sunscreen and a hat & sunglasses.
– Insect Repellent: More insect repellent in case of ticks and bugs, more active during the warm season.
#Winter
Warm Layers Insulating layers, waterproof shell, thermal gloves (cold-weather only)
Emergency Gear — Snow Shovel, Avalanche Beacon (if going to areas with avalanches). Make sure you are ready for winter related dangers.
– Hydration: Insulated water bottles for freezing prevention. Prevent water from freezing in sub-zero temperatures.
#Spring and Fall
– Layer up: Wear layers that can be easily shed or added as the temp changes. Having a waterproof layer for weather changes in rainy environments.
• Rain Gear – jacket and pants to stay dry in semi-predictable weather.
###Make Your Backpack Lighter
Lightening the load on your backpack leads to greater comfort and better performance. Some hacks to reduce this payload are:
Lightweight Gear-When selecting a tent, sleeping bag, or cookware, go with the lighter option. At The Tiniest Gear, we seek to cultivate a community of backpackers and thru-hikers to invest in the lightest gear possible without forgoing features.
– Smart Packing: Use of one multi-purpose item instead of Specific items which will be useful but only for certain type of purposed.
– Food and Water: Energy dense low weight bulk food & purify water only as needed to reduce the amount of water you have for transporting
How to fine-tune your backpack for the best comfort.
A properly adjusted backpack improves comfort and can help prevent injury. Adjusting your backpack for the best fit
– Hip Belt Adjustment – Assure the hip belt rides comfortably on your hips and is doing most of the heavy lifting. It has to be snug but not tight.
Shoulder Straps: Adjust the shoulder straps so they do not dig into your skin and feel comfortable on your body. The strap has to be tight but you should be able to move your scapula.
– Load Lifters: Be sure to adjust this to bring the pack nearer your back. It not only provides better balance but also takes some of the load off your shoulders.
5 Packing Mistakes You Should Always Avoid
Here are some common mistakes you should avoid for your trekking:
– Pack a too much: This is when the scales tip the opposite way and you are lugging an unnecessary weight around, and being uncomfortable to boot. Leave most of what you packed back at the car before embarking.
Unbalanced Weight: Poor Figuring out the weight is one of the most basic things that countless people do in an improper manner. Put your load more solid on your back, with the heaviest items also as close to the top of the pack.
– Ignoring Weather: Never forget to check the weather before you hike and pack too warm or cold clothes. Be ready with the changing weather.
Neglecting Comfort Items: don’t forget things that may make your trip more comfortable, like a sleep pad or good shoes.
Conclusion
How to pack a hiking backpack well is a mixture of both, experience and learning by doing. Use the ultimate checklist and packing guide to ensure you have what you need for any hiking adventure, from a day hike to multi-day trek. When you pack appropriately, you will have everything that you need without sacrificing your comfort and balance, which translates to a more enjoyable and successful hike. Happy hiking!