Beginner Guide on Hiking Navigation— Reading Trail Maps
Newcomers might find threading your way along nature’s trails to be a daunting exercise, or even an exhilarating one. One of the few tool you need to become better at reading trail maps is that a safe, fun & ultimately successful hiking experience awaits! After 20 years of hiking and mountaineering, I can tell you that learning to read these trail maps will be a huge asset in furthering your outdoor adventures. This detailed walking guide explains what you need to know when it comes to reading and understanding a trail map, starting from bullet points before diving into the necessary basics that entail steps for safely negotiating traversing various terrains.
What is a Trail Map?
Do trail maps help hikers and is the visual representation of hiking routes, terrain, and key features of an area beneficial to them or not??? Maps are the single most important source for mapping your hike or to figure out how far, where it is and what kind of terrain you will be faced with. They manifest in multiple formats, such as topographical maps, hiking maps or GPS digital map.
Types of Trail Maps
Topographic Maps:
Topographic Maps: These maps show different elevations using contour lines that represent the shape of the land. They contain information concerning hills, valleys, and slopes.
Practical Usage: Best used in understanding the topography and laying out routed with elevation changes.
Hiking Maps:
Introduction: Trail outlines,locations, and features They will have some basic topographic features but are intended for the trail.
Good For: Tracking exact trails, locating trail heads and identifying landmarks.
Digital GPS Maps:
Short description: Real-time navigation and tracking through GPS devices or smartphone apps. This may even consist of waypoints and elevation profiles interacting with you.
Oriented: Real-time tracking and route planning (weather & trail reviews also available)
Key Elements of Trail Maps
An iconic braided river, image by English WikipediaThere are some basics when it comes to using a trail map:
1. Legend or Key
Legend: This tells you what the symbols, colors, and markings mean on the map.
Refer to Legend: Trail symbols, water sources, campsites and more symbols decoded
2. Scale
Objective:The ratio of map distance to the actual ground distance.
What to do: Click on a scale bar and hover over the map to measure distances on the map, and estimate how long you think it takes offline.
3. Contour Lines
Purpose: Terrain Elevation changes and features.
Using: Seeks out the intervals between contour lines to see heights; to work slopes and landforms depending on gap between adjacent lines.
4. North Arrow
Objective: Illustrative role, used to display the orientation of map.
Compass Rose: used to orient the map with reality; align north arrow with actual north.
5. Trail Markers
Goal: Show various trails, their difficulty ratings and links
Use: From the signage, you will identify your direction and track progress by these trail markers from the junctions.
Reading Trail Maps and Interpreting Them
1. Orienting the Map
If you do not know how to read a map, the first rule is to sync the map.
Orient Map North Up: Align a north arrow on the map to true north. Use a compass or GPS device to get true north information
Match Features: Identify map features such as rivers and mountains to connect the points on a physical landscape with those on the map so that both get oriented in equinimity.
2. Understanding Elevation
Information i zvrstnost gušenja in načrtovanje progeElevation information is also important to assess the level of difficulty and prepare your intended route.
Contour Lines: Look at how close contour lines are to each other in order to determine the steepness of the terrain. Tightly packed lines represent steeper slopes, and more spread-apart lines refer to flatter terrain.
Elevation Markers: Find Elevation Points with labels to get precise observations of elevations at miscellaneous locations.
Elevation Profiles: Certain maps will contain elevation profiles that show you the hills and valleys of a trail, allowing you to prepare for your level of physical exertion.
3. Measuring Distances
The correct distance measurements can save you a heads wondering how much longer will it be until we arrive headach.
The Scale: All maps must have a scale indicating the ratio of distances. You will need this to measure the measurements of the map as well as do conversions from map units to real-world distances.
Plan Your Route -Draw your route on the Map and scale it to see how many miles it is in total. Segment the route for more accurate measurements
4. Identifying Trails and Routes
Remember: When it comes to navigation, knowing how to read trail markings and route information is crucial.
Trail Symbols: Identify symbols for different trails (e.g., hiking, biking) Legend: Symbols differ depending on the map provider
The above different information can be related to the trails difficulty as well, however, do not get confused with trail difficulty here are some of things that show how difficult is the way:- Pick the right skill level and fitness level trails
Intersections: At trail junctions and intersections. Those points are very important that prevent you from being in the wrong direction.
5. Recognizing Landmarks
PMD — Landmarks help orient you, and let you know whether where you are is on the trail,.
Natural — Search for natural features (e.g. peaks, lakes and rivers) which stand out. Here are some points to look at as you go alongynchpad Hit the mark
Human Structures: Other features that may sandwich the route, such as an outlying structure, sign, shelter or bridge.
Tips and Tricks for Navigating the Trail
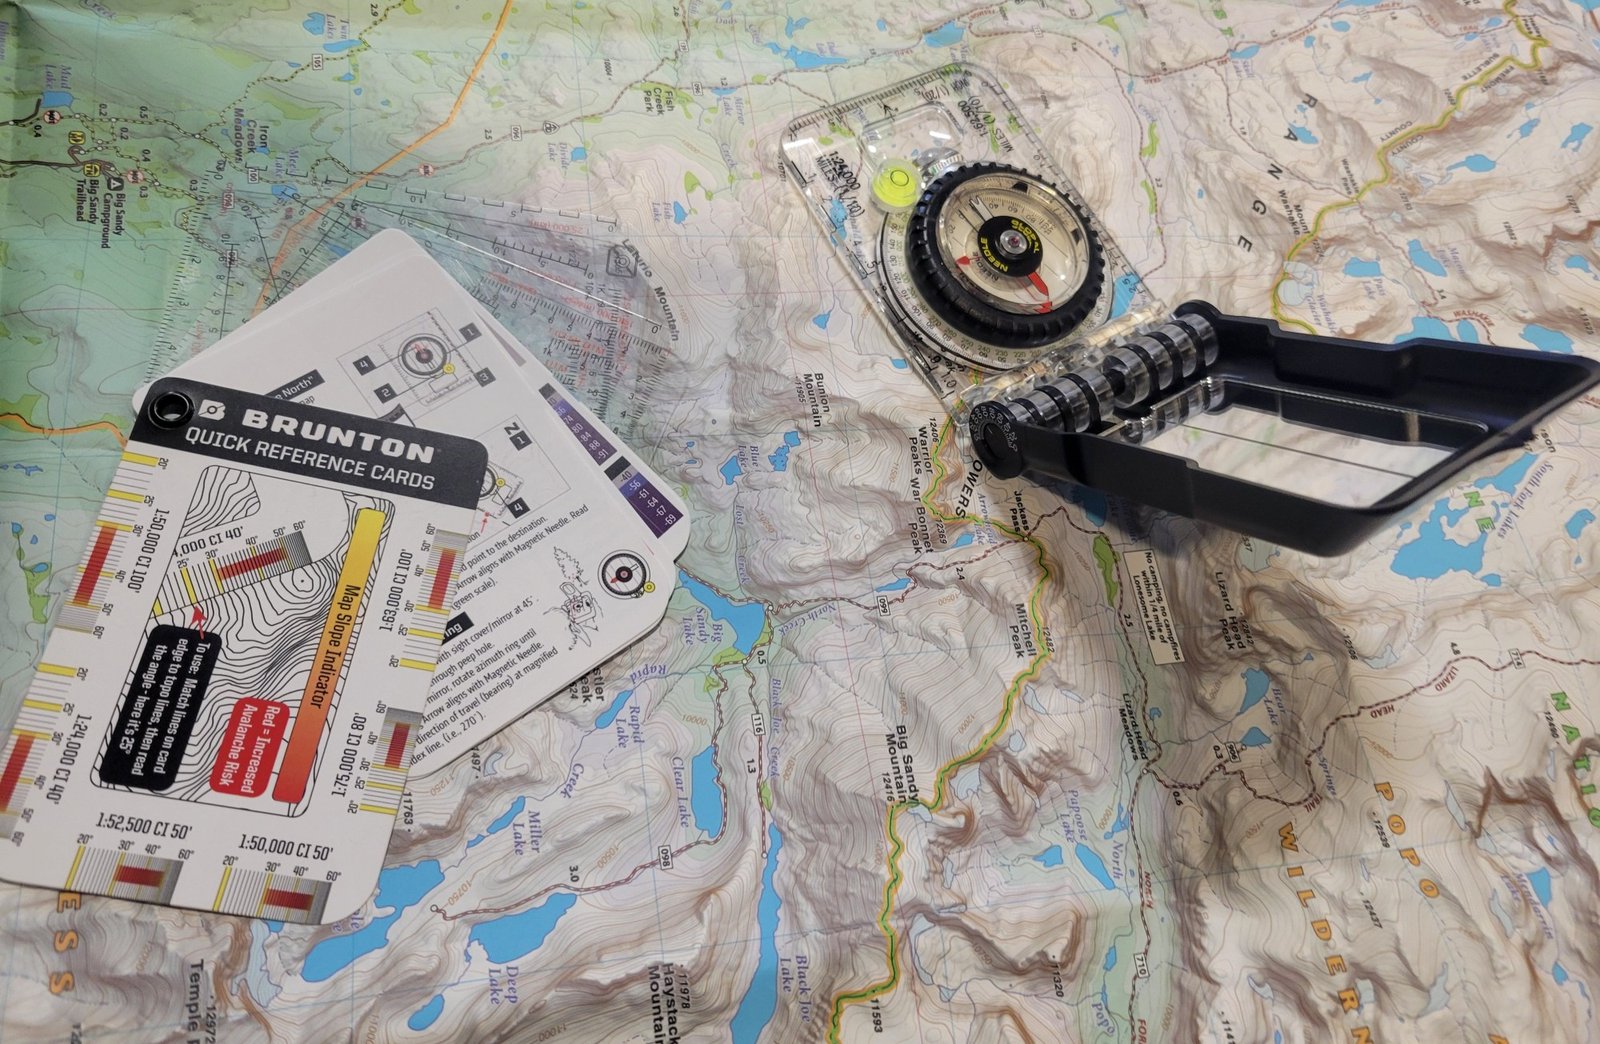
1. Compass
Compass — This is one of the most basic things and a must for everyone who loves trekking. Here’s how to use it:
Dec Setting: Set the compass for magnetic declination, or the local difference between true north and magnetic north. It then takes this into account and provides accurate readings for true north by basing the reading off of magnetic north.
Orient the Map: You take a bearing, line up the compass to your desired direction (i.e. where you want to hike,) read off what that bearing should be and then use it to orientate your map and find of where this line within which you lie is on that physical terrain.
2. GPS Devices
Advanced Navigation was made possible through GPS devices and smartphone apps.
Download Maps: Make sure that you have downloaded offline maps since the signal coverage might be limited.
Observe your Position: Use GPS to view your location and compare it with the trail map. This is to help keep you on the right path and also make any necessary corrections along the way.
3. Mobile Apps
Trail maps and guidance features are offered by many apps:
AllTrails is providing a proposed route and GPS, known as detailed trail maps and reviews. Great for finding fresh trails and not getting lost.
Gaia GPS — allows for custom maps and real-time offline navigation. Great for route planning and tracking
ViewRangerTrail maps, route planning and GPS tracker Has added functions such as augmented reality to recognize buildings.
4. Map and Compass Skills
Map reading supplemental with compass skills to improve navigation are: ·
Navigate a Bearing: Use your compass to navigate from one point on the map to another Point. Adapt to fit as needed and keep going on the path.
Intersection points: Look for features on the map of intersecting trails or landmarks, and see if these match with landmarks in your surroundings to confirm that you are where you think (or want) you are.
Navigation problems, and how to fix them?
1. Poor Visibility
If there is fog, rain fall or it is night, visibility low.
Gps Device: If the visibility is so poor, try to use a GPS for easy identification of the exact location.
Only, you know before going to the place carry a headlamp with you: To move in the low light and also if any tress or map details in front of that so it could be displayed properly.
2. Confusing Trail Markings
Sometimes, the indications can be deceiving.
Check the Trail Map Again: If you do this, you are making sure that the trail markers are in sync with the guide book map, and signs on how you should have adjusted your trip from marker to what the maps are telling you.
Follow trail signsFollowing official trail signs and markers will keep you on the right track and prevent any confusion.
3. Navigating Unmarked Trails
Unmarked or fainter trails can be more difficult to follow.
Use a Detailed Map — Bring a detailed map with prominent topographic features to navigate your way.
Follow Your Trail: mapping devices built in are used to see if you are heading the right location or not.
5 Tips for Navigating the Trails Like a Boss
1. Practice Before Your Trip
Be familiar with your map reading and navigational skills before you go on a walk. Build up self assurance navigating through your own local area on a map and compass.
2. Plan Your Route
Suunto/Map Your Route And Review Map Before You Head In For The Hike Be aware of route-finding challenges via key landmarks, junctions and potential hazards to expect on the hike.
3. Be Conscious of Your Environment
Keep an eye on your map and route, and make sure you’re going the right way. Look for trail markers, landmarks, different terrains etc.
4. Be Prepared for Emergencies
Bring a map, compass or GPS device, and first aid and other emergency supplies. Lean how to use these tools incase of emergency.
Additional Navigation Tricks
1. Topo Maps for Route Planning
Comprehensive topographic maps that offer in-depth information of the surface are crucial when planning on intricate routes.
Contour Analysis: Countour lines are rough guidelines we should follow looking for easier or at least less steep sections.
Elevation Gain: Determine how much elevation you will gain and lose to know how challenging the route is.
2. Night Navigation
This necessitates additional equipment and skills in night navigation.
The headlamp: Make certain it has juice and is bright enough to provide clear visibility.
Night Nav: Night navigational skills are not that hard to build once you practice at night for a couple of times on the map and learn how to use compass.
3. Complex Terrain Route Finding
Follow up with that is the difficult terrain where there are no trail, and you need some hiking or route-forwarding skills.
Landmark Identification – If you are finding a particular area difficult, use big tower buildings or specifically placed elements on maps to help guide your route.
Finding The Trail: Look For Cairns (stone markers), or some kind of indication that hikers have come this way before.
Trail Navigation of the Future
As technology pushes us forward the tools and methods to navigate trail continue to change.
1. Innovative Navigation Tools
Smartphone Applications: A host of new applications with features such as
AR and advanced route planning
VTS (Wearable Technology): Real-Time Navigation and tracking are done by units such as smartwatches with GPS.
2. Sustainable Navigation Practises
Leave No TraceFollow Leave No Trace principles and stay on established trails to ensure a proper environmental impact.
Sensitive Habitat: Do your part to minimize impact on natural areas and preserve the resource.
Conclusion
Every hiker should be able to read a trail map and navigate a trail. Understanding map ingredients, basic navigation skills and being prepared for what the trails can dish out will let you hike confidently therefore making your trip enjoyable while at the same time taking precautions to be safe. In my 20 years of hiking and mountaineering, I could say that there is nothing more important as a skill in the mountains than navigation. From beginner to seasoned hiker, improving your ability to read a map will boost your confidence, keep you safe on the trail and make each hike that much more satisfying. Get out on the trails and embrace the beauty of nature while knowing you are safely prepared to navigate through your adventure. Happy hiking!