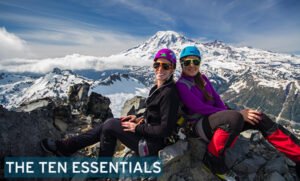
10 Tips to help you climb like a pro are here A Beginners Guide for moving towards Mountaineering Ultimate Gear List
Climbing is one of the pitons outdoor activities that can be enjoyed by all kinds of people. Having ascended peaks on multiple continents, afforded the opportunity to bask in the majesty of the kingdom of nature from high on a mountain — when I was not too cold or tired to take it all in. However, as with anything you have to be accomplished at overnight, or even in a season, new players may find the idea of setting up and operating their very first SuperHi machine intimidating.
Whether you’re new to mountaineering or have some experience under your belt, having the correct equipment and knowledge is a must if you want to make the most out of your time in the mountains without jeopardizing yourself. In this guide, we will discuss all what it takes for a beginner to start in mountaineering, from simple tips and the gear you need on your first tour. Let’s dive in!
Why Mountaineering?
In mountaineering or alpine climbing, you are meant to do more than simply climb to the top of a mountain–you’re also meant to push yourself physically and mentally, overcome personal demons and experience some of the wildest environments on Earth. A physical outdoor pursuit that combines hiking, climbing and survival skills in rugged environments. There is nothing comparable to the feeling of standing on top of a peak surrounded by pristine nature.
But to the inexperienced, extreme weather conditions found on the mountain can mean serious trouble. Which is why knowing the fundamentals and having the right tools are key.
Beginner Mountaineering Tips
1. Beginner Trails Will Develop Your Stamina
And then, start with some basic hiking tracks before you indulge in technical climbing. FOR Start building your stamina as this is a key step for little mountaineers. The first is long-distance hikes with elevation gain to train your body for the specific needs of mountaineering.
This way, you can make progress with hiking in high-elevation trails that will acclimatize your body to the thinner air; perfect for those who are interested in high-altitude mountaineering. These hikes will let you determine your physical prowess, mental grit, and the kind of gear you may need for more difficult resurges.
2. This is how you canlearn the basics of mountaineering
Hiking Up Steep Humps: Mountaineering = walking uphill on a hill Here are some of the basic skills you need to have on your fingertips:
Travelling through inclement weather: There will be a specific focus on map reading, knowledge of the compass and an understanding of GPS navigation. The weather can turn in the mountains and a visual awareness of where you are is crucial.
Ice axe: How to self-arrest on ice or snow Ice Axe: Ice axe technique is a necessity on any alpine route or climbing outing involving snow.
Rappelling off single points; Crevasse rescue (how to get yourself and others out of a dangerous crevasse on glacial climbs)
Rope techniques- Mountaineers use ropes to safeguard steep ascents, glacier crossings, or tricky ridge traverses. Being able to tie basic knots, belay, and set up anchors safely are fundamental first steps.
3. Join a Mountaineering Course
We recommend taking a beginner mountaineering course which will greatly increase your knowledge and visualization. Top-level guides will instruct you on basic skills in the real foothills. Courses in this field usually cover:
Rope handling and knots
Your ExpertiseGlacier travel and crevasse rescue.
Once they are confident getting around in their crampons and using the ice axes, we will review basic snow and ice climbing techniques.
Navigation and route planning
Alpine clubs in many regions offer inexpensive courses for novices, ideal to get a taste of the environment with important safety in mind.
4. Acclimatization is Key
As you increase in elevation, the air gets thinner and the oxygen decreases. Altitude sickness can be a real problem for first-timers. These symptoms are of headache, nausea,vomiting along with dizziness and breathing problems. The best way to avoid altitude sickness is by allowing your body time to acclimatize as you ascend in altitude.
As you increase in elevation (above 8,000 feet/2500 meters) the approximate rule of thumb is NO more than 1,000 feet of gain per day. This means that although this term is tempting, you should always respect your body and then unable to take more risks because with a consequence of high altitude disease.
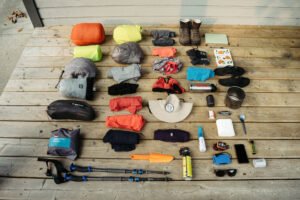
Basic Mountaineering Equipment
Having the correct equipment can either contribute to your success or make you feel the urge to give up during your mountaineering experience. This is an example of how appropriate gear can keep you not just comfortable, but also alive, in a brutal mountain environment. The following is a list of basic items that you must carry to your first mountaineering trip.
1. Mountaineering Boots
If you find yourself way up high on the snow-covered heights or hiking a rocky alpine traverse, stiffer and more supportive hiking boots will be a much better fit. This huge comment could also fall under the header of mountaineering boots, as it is referring to a degree of specialist care which the other three boot styles just don’t need.
The Best Cold-Weather Work Boots: Look for double-insulated boots if you’re going into really cold conditions Tip: The fit is key — uncomfortable boots will hurt your trip and give you blisters or even frostbite. When trying on your boots, be sure to wear the socks you plan on wearing for your climb and walk around in them before hitting the cash register.
2. Crampons
Crampons: Spiked devices that fit directly to your boots, providing better grip on ice and snow. If you are a beginner, we advise general-purpose crampons which can be used for glacier travel through the ice climbing. Make sure your crampons work with your mountaineering boots.
3. Ice Axe
A generic-simple ice axe can be used to assist you up a steep pass, balance yourself and brake your fall if you slide away. There’s a few different types of ice axes, but the classic mountaineering axe is best for novices. Make sure to use it before you head out the door, this little guy can mean the difference between life and death when rain turns to snow or ice.
4. Helmet
Falling rocks and ice occur frequently in alpine environments so wearing a helmet is incredibly important for all mountaineers. A few things that you will want to check here include a lightweight, yet tough exterior shell, full head coverage design and some form of ventilation holes which are essential for the long climbs up.
5. Climbing Harness
When the goal is to join a team on glacier travel or wired climbing, a quality harness to climb in becomes obligatory. Ensure it is lightweight and comfortable as well as adjustable to wear on top of multiple layers. Before you take your trip, practice putting it on and adjusting it swiftly.
6. Rope
All mountaineering ropes are durable and have been made with the materials and specific type of design which can serve in all extreme conditions. Beginners will use a glacier travel/technical climbing set up which means using 1 or 2 single, half or twin ropes (dynamic) for the trad climbing parts.
It always makes sense to have a piece of climbing rope with you, long enough to abseil down a steep part on your tour.
7. Clothing Layers
Finally, the weather on mountains can change at any drop of a hat and with that the temperatures in higher altitudes can plummet very quickly. This is so you can layer up clothes to regulate your body temperature. Here’s what you’ll need:
Base: A thermal, moisture-wicking layer that should keep your skin dry.
Insulating layer: Down or synthetic filled coat to provide warmth in cold conditions.
Shell layer: This is your waterproof and windproof outer shell that protects you from the wind, snow, and rain.
You should carry extra clothes (socks and gloves in particular) in case your gear gets wet.
8. Backpack
Overnight and longer trips require a larger mountaineering backpack (45–60 liters) to tote your gear, food, and water. When purchasing your pack, look for those with an internal frame to support heavy loads and structures that include reinforced attachment points on the outside for ice axes, crampons, and snow stakes as well as an adjustable harness system designed to distribute the weight of this hefty bag comfortably.
9. Headlamp
On the mountain, mountaineering often require early morning starts starting at midnight and back only by sunset. That means a good headlamp, possibly the best one you can afford with a few extra sets of batteries to go with it.
10. What Is Included In A First Aid Kit and Emergency Supplies
Safety safety safety, Safety first, Be safe A personal first aid kit with blister treatment, adhesive bandages, painkillers, and prescribed medications.
Also, bring an emergency bivy (a light-weight portable shelter), fire starter, knife and more food in case you are stuck longer then plan.
How To Plan Your First Mountaineering Trip
After you have all your gear, basic skills and a bit of experience it’s time to organize your first mountaineering trip. As the saying goes, preparation is key to any successful adventure.
1. Select the Right Mountain
For your first mountain adventure, find a place that you can handle as far as difficulty. Find trails that are not too aggressive with big challenges yet still have a fair amount of elevation gain to give you a flavour for the alpine setting. The most popular mountains for beginners include;
7) Mount Hood (USA) — A beginner’s peak for aspiring mountaineers in Oregon.
Mount Kilimanjaro (Tanzania) 19,308 feet: highest peak in Africa and a non-technical climb.
Ben Nevis (Scotland) — The highest mountain in the British Isles is several beginner routes.
2. Weather and Terrain Check
Weather can be unpredictable in the mountains, so it is important to check this before you plan your trip. Pack for rain, snow or windy conditions and make sure you are ready to turn around if the weather will worsen.
Risks related to avalanches must be known, especially in snow-covered terrains such as in wintry sites. Make yourself aware of avalanche predictions and some experience with snow movements before you set out over an area that falls under the risk zones.
3. Plotline and Types of Gear a Plan your Route
Do extensive research on your chosen trail Distance, elevation gain and anything super technical or gear/skill dependent. You should plot your route on a topo map and might want to carry an extra GPS device for peace of mind.
Conclusion
It is a gratifying, tough and demanding discipline for which you have to be mentally prepared as well as physically fit. When you make take the effort to develop your skills, create dividends in valuable gear and consider possible trips carefully, then scale up and new highs can seem a lot closer!
It has an easy top-out, remember: mountains demand respect.
Remember to “summit safe” by making the summiting a secondary goal and be willing to turn back if conditions are not ideal for your journey. The peak is always going to be there, but your safety comes first.
Each trip will help you grow as a mountain climber and each climb is another step towards becoming one. So tie up your boots, grab your pack and you will not be disappointed in the least on how rewarding these trails become when reaching the top!